 |
Sienna Moonfire DesignsPacific Coast Picture Stories |
| « last ... | :: home :: contents :: obsessions :: | ... next » |
Single or Double Pie Crust | |||||||||||||||||||
|
"Vegetables are a must on a diet. I suggest carrot cake, zucchini bread, and pumpkin pie." -- Jim Davis |
Use single pie crust recipe for Pecan Pie, or any single crust pie (to be honest, I usually make the double crust & plan on making another pie soon -- the dough does freeze well). Double the recipe (on right) for Apple Pie, Strawberry Rhubarb Pie or any double crust pie. This recipe looks long but that's because I've tried to include all the little tips I've learned over the years -- it's only taken me about 5 years to get my crust down!
* on flour: I like to use half white, half whole wheat pastry flour. For a single crust I measure out a generous cup. For a double crust I use a generous cup of wheat & a flat cup of white -- I like my crust to have texture.
** on butter: Butter is what makes the crust so tasty, so I always use the full stick (1/2 cup) for a single crust & two sticks (1 cup) for double crusts. I've played with using less, so I've included the minimums for the timid -- but let's face it, if you're worried about butter you probably shouldn't be making a Pecan Pie! instructionsWith a strong fork, chunk the frozen butter (it doesn't have to be frozen but it helps to leave the chunks in for a flakier crust) into the flour & salt. Mix & mash it up with a pastry knife until the butter's broken up into small & medium chunks. Add water slowly & knead by hand. Start with 3 tablespoons of water (5 for double crust) & add more until it starts to hold together. You don't have to use all the water! Sometimes just the warmth of your hands is enough to tip the balance without adding more water. It shouldn't be completely blended -- some dry pockets & butter chunks will make it flaky & crisp. Overworking it will make your crust tough. If you want a lot of texture, you can add some almond meal when your dough is almost kneaded. Sprinkle almond meal across the surface of your dough & press it in until your dough is flat across the bottom of your bowl. Fold it, sprinkle some more almond meal on both sides, press it together, fold it again & press it together. Don't worry about pressing it too firmly together -- it will get rolled together later & the almond meal layers will add nicely to your crust's flaky texture. | ||||||||||||||||||
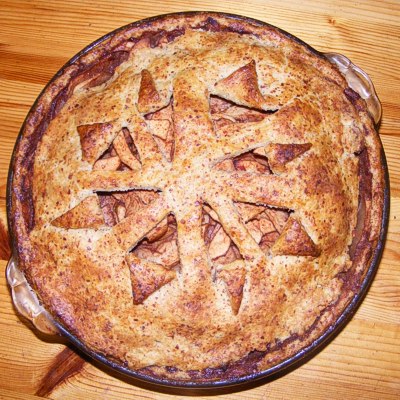
Don't overwork your dough! Just work it enough so you can pick it up & get it into the pan. When it looks to be the right size & thickness, place the crust in a buttered 9 to 10 inch pie pan. Trim the edges & make 'em pretty (fold extra over & flute it if you like crust), patch any holes (use your ice water to seal), & (if you have time) stick it back in the fridge for at least 20 minutes (up to 24 hours). Roll a top crust out the same way, but roll it a little thinner & it won't need to be as large as the bottom one. Transfer it carefully to a floured baking sheet (or, if you are making a complex design, definitely use wax paper). Cut out some cute little designs (diamonds, stars, hearts), or at least poke some scattered holes into it, for the bubbles to escape from your filling. Chill it for at least 20 minutes (up to 24 hours) to make it easier to place (&, really, forget that little jab & waste the wax paper if you're making a woven crust or some other work of art). I never bother with a woven crust because it's such a pain to cut (if you want to make one, you'll need a bit more dough, rolled out as large as your bottom crust, cut into wide strips, woven with gaps almost as wide, & it works better on a Strawberry Rhubarb Pie than an Apple Pie, which shrinks as it cooks, leaving the crust high & dry), but I have been known to cut out crust stars & put together a hole-y crust that way. Be creative -- & remember to take a picture!  Apple Pie You can see that my top crust does not reach the edges (no need). To make openings for the steam, I just sliced & folded back the crust in a star-like design. Tips & NotesCoat the edges (& top crust) with egg white just before putting it in the oven to give it a nice shine. If you have extra bits of crust: make little circles & squinch up the edge so they're little tartlets. Put in some fruit preserves (just your favorite jam or jelly if that's what you've got) & bake for 15-20 minutes. To bake an empty crust: cover it with foil (make sure to get those edges!), weight down the center with beans or pie weights, & bake at 350°F until it's golden (15-20 minutes). When baking a pie, always put your filling in the crust & put the pie directly into the preheated oven. If you need to let the filling sit, let it sit in the bowl & leave the crust in the fridge, where it's safe & dry -- otherwise? Soggy bottom (boys). For the same reason, always bake your pie on the center rack of your oven. I have begun to experiment with organic shortening, to add to the flakiness of the crust. My current notes say to use 8 tablespoons butter with 6 tablespoons organic shortening. I haven't tried it, but I've heard that using vodka in place of water ups the flake factor mightily. | |||||||||||||||||||
| « last ... | :: home :: contents :: top :: | ... next » |

|
Sienna Moonfire Designs Pacific Coast Picture Stories Website Creation & Maintenance last updated 30 October 2014 :: 10:10 am Caspar (Pacific) time click to email: sienna m potts | |
|
unless otherwise noted, entire website (design, words & images) copyright © 2001-2024 Sienna M Potts all rights reserved, thank you | ||